


 Reply With Quote
I believe you provide them with measurements and they come pre-cut to the proper width and length for each shell. As a bonus, the bass wrap is all one piece. If you screw one up during install, they'll send a replacement for free.


I'm curious to see how the wrap ships. Did you get individual pieces or several sheets to cut? Will it come in a tube or flat shipping container?
I'm about to pull the trigger on a wrap for my resurrection kit.
This is the finish I removed from them.
This is how they currently look after a $5.00 can of spray paint.
Just can't decide on the finish. So many choices. Grrrr
Last edited by Bish; 12-31-2014 at 09:32 AM.
Signature here
I believe you provide them with measurements and they come pre-cut to the proper width and length for each shell. As a bonus, the bass wrap is all one piece. If you screw one up during install, they'll send a replacement for free.
-Brian
"Too many crappy used drum stuff to list"
Play the SONG......not the DRUMS!!!
"I think that feeling is a lot more important than technique. It's all very well doing a triple paradiddle - but who's going to know you've done it? If you play technically you sound like everybody else. It's being original that counts." ~ John Bonham
I'm curious to see how the wrap ships.
If you go to about 2:39 in this video, it looks like it comes rolled up in a box. However, if you are ordering wraps for an entire kit, I'm not sure. This video features just a snare wrap.
Did you get individual pieces or several sheets to cut?
I got individual pieces pre-cut. They cut 1/4" from the top and bottom to make room for heads and rims.
Will it come in a tube or flat shipping container?
As mentioned before, I'm assuming that it comes in a box rolled up. I'll take pics when I get mine.
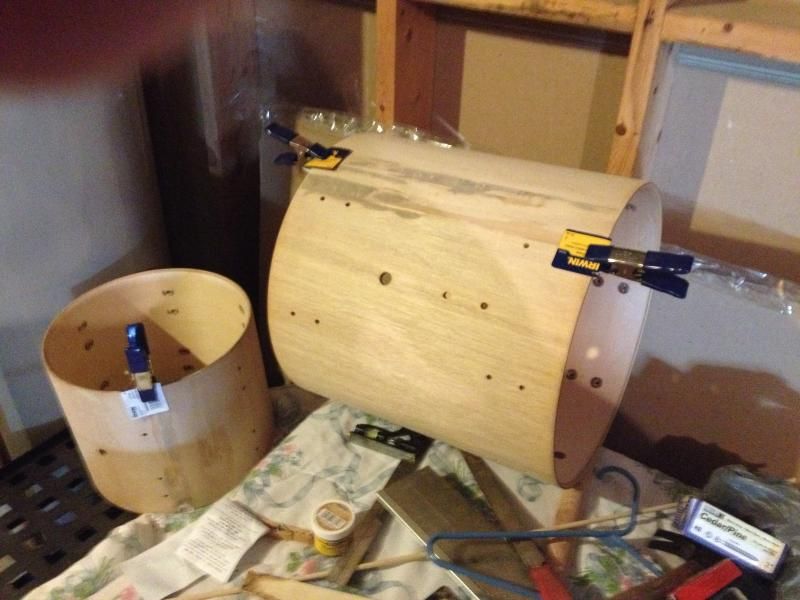
Shell update:
Went downstairs to do some final sanding and inspection and do minor work. I noticed that left my putty lid open!
I only needed to fill very MINOR holes, so I used wood glue. I also did some more minor sanding.
I worked on the snare some too. With some minor, concise taps to the grommet hole on the snare, I got it looking pretty good, so that's fixed. I also got the glue off the shell from where the badge was. I scratched it up a little, but I wasn't terribly careful because I'll be re-covering it as well.
All for now! I just noticed that my package was sent with 2-day shipping from Maryland to NC, so I'm hoping that it will arrive on Friday.
More to come....
(Rubbing eyes) Am I looking at a set of all shells at a 6-lug construction ?Originally Posted by Bish

There is a first for everything.
Gretsch USA & Zildjian(What Else Would I Ever Need ?)
I believe there's only 5 on maybe first tom and the floor tom for the (resurrection) black candy corn kitha ha Joking Bish! Should look great after a re-wrap!
The putty job looks great porkpieguy! I really can't tell by pic but it looks like you may have some tiny splinters by the bearing edge. I've taken some 220 sandpaper and very gently by hand rubbed the bearing edge with good results.
Last edited by Olimpass; 12-31-2014 at 12:29 PM.
Good eye! You are exactly right. This morning, I squirted some wood glue down into the splinters and then clamped it. I'm going to look later on this evening to see if it held. In addition, the bearing edges on the opposite side looks really good. Since that is the rack tom, I checked out the holes and sure enough, if I need to, I can turn it over and use the bottom as the batter side. The vent hole is exactly halfway in between the batter and reso side. I filled the badge holes, and there are no holes for mounting hardware, so there's really no telling which side is up.
I'm curious to see how it turns out. I'm going to check it out tonight.
Some company's ship in a box, some ship in a tube.
Which ever, as soon as you get the wrap, unpack it and get it laying flat.
I did not trip and fall. I attacked the floor and I believe I am winning.
porkpieguy
What method are you going to use to attach the wrap?
Glue or the tape method.
I did not trip and fall. I attacked the floor and I believe I am winning.
Tape method. It already comes attached.
I played on a TKO kit for a year until I bought my Premiers. (borrowed them from our bass player's son). It only had 4 lugs on the 12" & 13" toms, 5 on the 16" FT and 6 on the Bass. It worked great....as long as you tuned for that dull, slappy, wet paper bag sound, LOL.
-Brian
"Too many crappy used drum stuff to list"
Play the SONG......not the DRUMS!!!
"I think that feeling is a lot more important than technique. It's all very well doing a triple paradiddle - but who's going to know you've done it? If you play technically you sound like everybody else. It's being original that counts." ~ John Bonham
Actually all 3 toms are 5 lug. Not easy to find them since I had to buy the reso hoops. The kit was piled up in a garage for years and since I didn't spend a dime on them and they were delivered, I figured I could put a few bucks in them and use them for non-home use or a community kit.
Surprisingly, after new heads were put on, they sound great. The bass drum rivals higher end kits. I was very shocked.
Signature here
Here's a little better view of the floor tom.
Sorry for jacking your thread, PPG. I'm done. Back on topic.
Signature here
I don't ever remember seeing a 6-lug bass or a 5-lug floor tom.
I do know I have seen some smaller toms with 4 or 5 lugs.
I have an old Slingy student snare from 1964 that is a 6-lugger.........sounds good.
Gretsch USA & Zildjian(What Else Would I Ever Need ?)
Lot's of MIJ, MIT bass drums came with only six lugs.
I did not trip and fall. I attacked the floor and I believe I am winning.
Didn't realize it only has adhesive on one small part. But I guess the lugs will hold down the wrap everywhere else.
Last edited by SpazApproved; 01-01-2015 at 01:24 PM.
Yup, this is a big debate regarding how to apply drum wrap. Some say that only having adhesive at one spot is best while others claim that gluing to the entire shell is best. From what I've researched, here seems to be the major pros and cons that I've run across:
Pros for glue-strip-only adhesive:
- Super-easy to install
- Easy to remove if re-wrapping is desirable.
Cons for glue-strip-only adhesive
- May not hold has well as all-over gluing to shell
- Less professional
Pros for all-over gluing to shell:
- Holds better than glue-strip-only
- It's more traditional
- It's what the majority of the pros do
Cons for all-over gluing
- It's difficult to do if you don't know what you are doing.
- Messy, messy, messy
- As shells age, they may expand and contract with changes in humidity time and time again. As time moves on, the wrap may split and/or bubble in places
Once again, all of this is open for debate. I don't know which is best, but I'm doing what's easiest and makes the most sense to me. I'm going for the single adhesive strip. It seems to work for a lot of folks, so why not? I don't want this to turn into a debate. If someone wants to start another thread to discuss it, have at it! Let's not do it here if that's ok!
Update:
As I wrote yesterday, I did some minor hammering to the vent/grommet hole. Here's the before and after:
Before:
After:
Wraps may arrive tomorrow, but more likely Saturday. I went down to check out my splintering edge repair. To fix the splintered edge, I took some wood glue on the splinters, "tapped" it with my finger to get glue to get in between the splinters and the shell, put paper over it, and clamped it. I didn't want the glue sticking to the clamp itself, and I knew that I could sand off the paper. This process worked really well! So well, in fact, that I found a couple of very minor splinters around the edges and decided to repair those as well. Here's a pic of them clamped up:
Looking back on this, it's probably a blessing that it's taken a week for my wrap to get here because I probably wouldn't have taken the time to fix all of these little minor repairs that when taken as a whole, will probably make a substantial difference in sound and durability.
Thanks for reading so far! I guess I'll need to do some sanding tonight or tomorrow, and I should be done as long as nothing else comes up.
Don't forget that when they glue the wrap entirely, the wrap essentially becomes another ply of the shell from an acoustic perspective. I'm sure it makes a subtle difference in sound, but probably not enough to worry about. If it was an expensive traditional wrap, I would probably glue it. The stuff from Bum Wrap, I would tape it as well.
-Brian
"Too many crappy used drum stuff to list"
Play the SONG......not the DRUMS!!!
"I think that feeling is a lot more important than technique. It's all very well doing a triple paradiddle - but who's going to know you've done it? If you play technically you sound like everybody else. It's being original that counts." ~ John Bonham
I'm thinking of gluing in intervals approx where lugs will go. What does anyone think of that?
all the best...
It sort of reminds me about the debate on the Acoustic Guitar Forum as to whether or not a cutaway makes a difference in sound of a guitar or not. I'd bet that if one was able to have three exact drums side by side, one with no wrap, one with a glued wrap, and one with single strip of adhesive, the average person would not be able to tell the difference. I'm pretty sure that I wouldn't be able to tell anyways...
Yup, if it were an expensive wrap, you bet I wouldn't be doing all of this myself as my skills are not as they should be.
Last edited by porkpieguy; 01-01-2015 at 03:33 PM.
Ok, in trying to keep things on track, I started a thread as to whether a wrap glued all of the way around vs. a wrap glued with a single strip makes a difference in sound. It can be found here! --> http://www.drumchat.com/showthread.p...6.html?t=32816
Update!
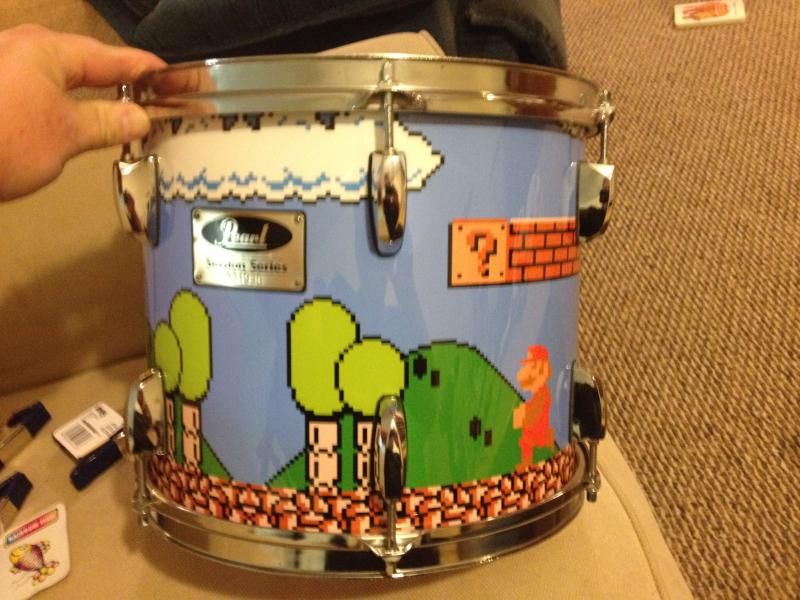
Wraps arrived yesterday. I think that Bish was interested in the packaging. Here's what it came in: a box with each wrap rolled up inside of itself using thin, flexible foam as protection between each layer:
The wrap was thicker than I thought it was going to be. I was so crazy careful filling in each little divot in my toms. I'm glad that I did it, and I'm sure that it adds to the stability of each drum, but I'm sure that the wrap would have covered it.
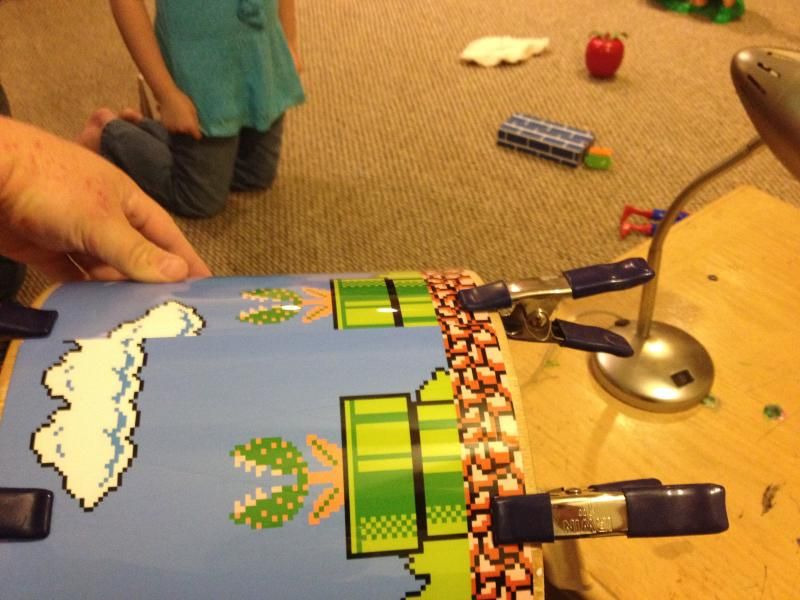
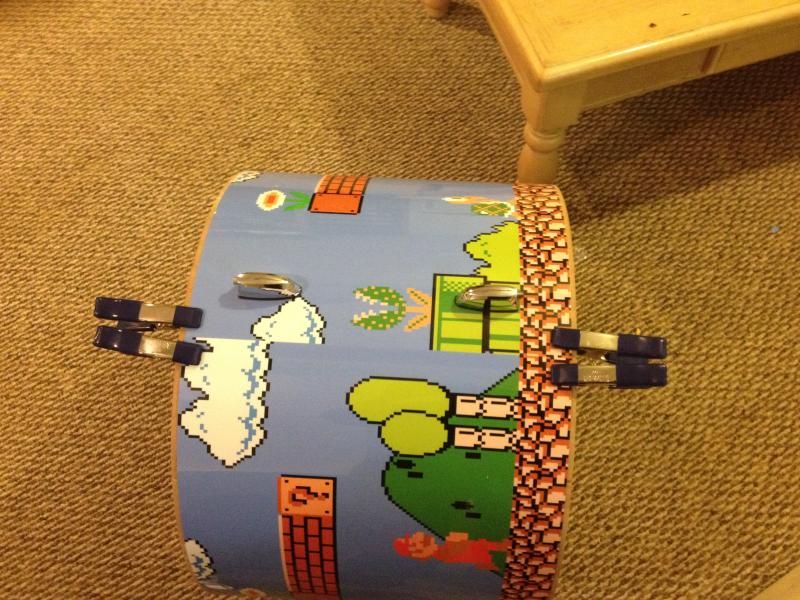
Because my wrap is a mirrored scene, I had to make sure to get everything lined up just so. Here's a picture of my rack tom after I had clamped it. I used a small flashlight to shine a light through the holes to make sure that it lined up before I unpeeled the sticky 2-sided tape to install it. I feel like I need to mention that the wrap is thick enough to where I needed to shine the light directly into the hole in order to be able see it come through as opposed to just holding it down into the shell.
Here's a picture of the wrap just before I took the backing off of the tape. Everything is clamped into place and pulled tightly. I really don't see how this project is possible without these little clamps. I had to get the wrap pretty even on the top and bottom (Bumwrap leaves a little breathing room on their wraps in case you want to put this over your existing wrap). The seam is, of course, at the back of the drum.
Last edited by porkpieguy; 01-03-2015 at 08:22 AM.
Continued:
In the instructions, one can either use an Exacto knife to cut out the holes for the hardware, or a drill can be used if you use a block of wood in behind it. The tip on my Exacto wasn't terribly sharp, so I used the drill method, which worked just fine. I drilled from the inside with the block of wood on the outside. The bit that I used was slightly smaller than the hardware screws, so I could put the screws through the shell and the wrap would hold them in place. This made installation easier. Also, in doing this, I felt that the hardware "pulled" the wrap tighter onto the shell. This worked well.
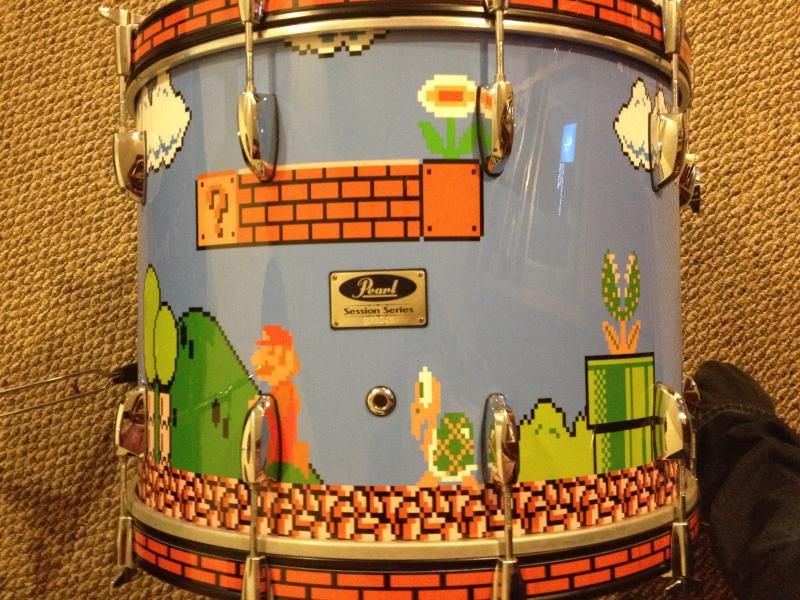
Here's the rack tom completed! I thought that it turned out great!
After I got through with the rack tom, I decided to work on the kick. It took a few more clamps to get the wrap tight. Here's the bottom seam, and me trying to get it tightened up.
I was happy to see that the top of the kick wrap was not a mirrored scene the way to toms were. If I wanted a mirrored scene on the top of the kick, the wrap seam would have been on the side. I love the way it lined up.


Bookmarks